7.31.2010

Table Refinish

Our table is a little....okay, a lot USED. Our kids have forked it over and over, dug holes in it, etc. I have been wanting a dining room remodel for a while.

Okay, so I didn't get the whole remodel of the dining room, but one new piece can make a big difference.


Here is a picture of what our dining room recently looked like:


Our dining table was so bad that I had to start covering it with a table cloth to make it look half way decent.

So, when my friend moved into her new house and the previous owners had left a table there, I told her that I wanted it (thank you Rebecca) since she was just going to get rid of it.

Here it was at the beginning.


Potential....Right?

Okay, look up close. I had a lot of work to do.


The leaf (that was folded under during these pictures) was actually in good shape, but I wanted to stain the top dark.


So, I started by putting the leaf in and stripping and sanding the entire top.


(here is a picture of the leaf )


Then I used a combination poly and stain (5 coats of it) to stain the top and get exactly the color that I wanted it to be.

Here is how it turned out...

I still plan on painting my chairs an off white to match the bottom of the table. I am super excited. I love how it turned out. I can't wait to see how it looks all put together with the chairs done and everything.


7.30.2010

Mashed Potatoes

Good Ole' Mashed Potatoes. Everyone needs to know how to make good ones. It took me 7 years of trying to find this recipe and love what came from it.

Mashed Potatoes

Kosher salt
3 pounds boiling potatoes, such as Yukon gold, peeled
1/2 cup whole milk
1/4 pound (1 stick) unsalted butter
3/4 to 1 cup buttermilk
1/2 teaspoon freshly ground black pepper

In a large pot, bring 4 quarts of water and 2 tablespoons of salt to a boil. Meanwhile, cut the potatoes into 1 1/2-inch cubes and add them to the boiling water. Bring the water to a boil again, lower the heat and simmer uncovered for 10 to 15 minutes, until the potatoes fall apart easily when pierced with a fork.

Meanwhile, heat the milk and butter in a small saucepan, making sure it doesn't boil. Set aside until the potatoes are done.

As soon as the potatoes are tender, drain them in a colander. Place potatoes back in pot and mash with potato masher or process in food mill.

As soon as the potatoes are mashed, stir in the hot milk-and-butter mixture with a whisk or rubber spatula. Add enough buttermilk to make the potatoes creamy. Add 2 teaspoons of salt and the pepper, to taste, and serve hot.

7.28.2010

Individual Potato Cups


I personally believe that baked potatoes go with so many different main dishes.

It is a 'go-to' side here at my house.

Typically I just throw the potatoes in the microwave for a couple minutes if I am in a hurry.

One day when I was lollygagging around the house I wanted to try something different. That something different just happened to be this recipe.

And let me tell you…they are delicious (even IKE gave the approval and he doesn't normally rave over a potato unless it is mashed)


*** CAUTION to all calorie counters out there
***

If you are trying to loose weight…don't even try this recipe. It will lure you in and trap you. I am going to try it out with olive oil instead of butter and then a little sour cream for the moisture. They were super yummy, I was just overwhelmed by the amount of butter in them and I even cut it down from the original recipe


Ingredients:


6 -8 Whole Potatos
1 Stick Butter (I used a little less)
Slat & pepper
1 cup shredded cheese
1/2 cup diced ham (optional)
1/4-1/2 c. scallions
12 tea. whole milk (or 2%)

Directions:


Pierce Potatoes and cook in Microwave until slightly soft (about 12-15 min). Set aside and let cool until you can handle them. When they are cooled, slice them about 1/4 in. thick into rounds.

Place 1/4 Tbsp pats of butter in each mold of the muffin/cupcake pan, then a slice of potatoes, a pinch of salt and pepper, then cheese, ham and scallions. Repeat layers: potato, salt & pepper, cheese,ham, scallions. (I only did 2 layers, but I suggest going up to 3 because they shrink when they cook.) Top each mold with another pat of butter and drizzle each with 1 tsp of milk.


Bake in the oven at 400 degrees for 20 – 25 minutes, until cheese is melted and potatoes are brown.

7.26.2010

Million Dollar Peanut Butter Cookies


LITERALLY people….the genius AKA Caolyn Gurtz who created this recipe literally won a million dollars for these.

It's a twist on the classic peanut butter cookie. Crunchy outside, creamy inside, with just a hint of cinnamon.

A real winner.


Ingredients:

Makes 24 cookies

  • 1/4 cup Fisher dry-roasted peanuts , finely chopped
  • 1/4 cup granulated sugar
  • 1/2 tsp. ground cinnamon
  • 1/2 cup JIF creamy peanut butter
  • 1/2 cup powdered sugar
  • 1 roll (16.5 ounces) Pillsbury refrigerated peanut butter cookies , well chilled
  • Crisco original no-stick cooking spray

Directions:

Heat oven to 375°. In small bowl, mix chopped peanuts, granulated sugar and cinnamon; set aside.

In another small bowl, stir peanut butter and powdered sugar until completely blended. Shape mixture into 24 balls, about 1 inch each.

Cut roll of cookie dough into 12 slices. Cut each slice in half crosswise to make 24 pieces; flatten slightly. Shape 1 cookie dough piece around 1 peanut butter ball, covering completely. Repeat with remaining dough and balls.

Roll each covered ball in peanut mixture; gently pat mixture completely onto balls. On ungreased large cookie sheets, place balls 2 inches apart. Spray bottom of drinking glass with Crisco original no-stick cooking spray; press into remaining peanut mixture. Flatten each ball to 1/2-inch thickness with bottom of glass. Sprinkle any remaining peanut mixture evenly on tops of cookies; gently press into dough.

Bake 7 to 12 minutes or until edges are golden brown. Cool 1 minute; remove from cookie sheets to cooling rack. Store tightly covered.

Recipe created by Carolyn Gurtz, winner of the 2008 Pillsbury Bake-Off Contest

7.25.2010

Big Flat Pancakes (i.e. Crepes)


Do you have recipe's that bring back a lot of memories?

Big Flat Pancakes is one of those for me.

When I first got married my husband kept asking me why I called them big flat pancakes when they were really crepes. I don't know the answer to that except that my mom, my grandmother and my great-grandmother have always called them Big Flat Pancakes.

So, why not stick with tradition?!?...Right!

Right!

This recipe brings back memories from my early days living in Murray, to my high school days sitting at my uncles table eating as many as possible, to my college days where I started the tradition of inviting friends over on the Saturday Morning of General Conference to eat them, to my current life watching my children being completely satisfied after stuffing their faces.

So, do you want to start using this recipe?

Then here you go….

(ps...I think this is the first time that I have ever written down this recipe. I have known it in my head since I was 12. Everyone in my family calls me when they want to make them so that they can get the recipe, so count yourselves lucky!)

Tyler Family Big Flat Pancakes

Ingredients:

2 ¼ c. Milk

4 Large Eggs

Dash of salt

1 T. Sugar

¼ c. Vegetable Oil

2 c. Flour

½ t. cinnamon (this is not in the original recipe, but something that I have added over the years)

Directions:

Blend all ingredients in a blender. If you like your crepes thinner, add about ¼ c. milk.

Warm a large griddle to 300 deg. (you can use a skillet on the oven…I don't like how uneven it cooks the crepes).

Pour 2- 3 T of batter on griddle. Pick up edges of griddle and turn the pan in a circular motion so that you can make a large circle. The faster you turn the batter, the thinner the crepe will end up, so pick it up fast and turn.

Cook for about 2-3 minutes, flip and cook for 10-30 sec.

Serve. I love mine warm with a little butter and sugar (or cinnamon sugar) sprinkled over the top. There are lots of options. You can fill with fruit and whipped cream, nutella and Banana's…the possibilities are endless.

7.23.2010

Headband Fun

Here is a headband that I have been working on.
The steps are really simple.

First you cut out a couple circles (I did 3), but you can do up to 6.
Then take a lighter and burn the edges of the fabric.
Once done burning the circles, stack them in decreasing sizes.
Hot Glue them together and then hot glue the embellishment in the middle.
Hot Glue the flower to the headband, then flip the headband over and place another round piece of fabric on the other side to cover the glue and to keep the flower in place.

Here are the steps in picture form.


Oh yeah, and the total cost was under a dollar each.

7.21.2010

Strawberry Heaven


Here is a very yummy summer treat that is very light.

The first time that I had these was at a family reunion last summer (Thanks Diane!), I am about fell over and went to heaven.

I LOVE THESE TREATS!

You must try them if you have not already.


Strawberry Pretzel Squares

(Source: Kraft Foods)

2 cups finely crushed pretzels
½ cup sugar, divided
2/3 cup butter or margarine, melted
1½ pkg. (8 oz. each) PHILADELPHIA Cream Cheese, softened
2 Tbsp. milk
1 cup thawed COOL WHIP Whipped Topping
2 cups boiling water
1 pkg. (8-serving size) JELL-O Brand Strawberry Flavor Gelatin
1½ cups cold water
1 qt. (4 cups) strawberries, sliced

PREHEAT oven to 350°F. Mix pretzel crumbs, 1/4 cup of the sugar and the butter. Press onto bottom of 13×9-inch baking pan. Bake 10 min. Cool.

BEAT cream cheese, remaining 1/4 cup sugar and the milk until well blended. Gently stir in whipped topping. Spread over crust. Refrigerate until ready to use.

MEANWHILE, stir boiling water into dry gelatin mix in large bowl at least 2 min. until completely dissolved. Stir in cold water. Refrigerate 1½ hours or until thickened (spoon drawn through leaves definite impression). Stir in strawberries. Spoon over cream cheese layer. Refrigerate 3 hours or until firm. Cut into squares to serve. Store leftovers in refrigerator.

7.20.2010

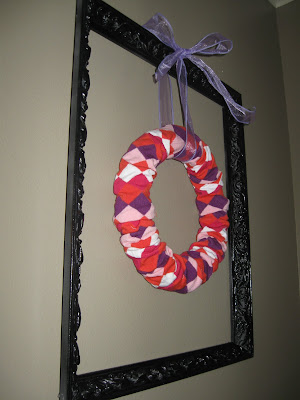
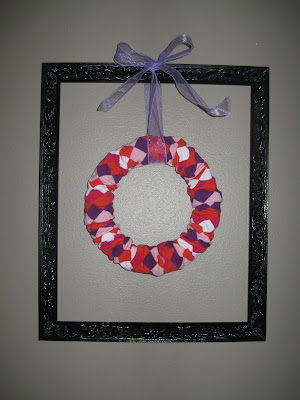
Sock Wreath

I have been wanting to do a quick and easy Decor Project.

I saw these sock wreaths on Blue Cricket Design.

I already had most of the stuff for it, so it was time to begin.


If you check Out Blue Cricket Design, she has a tutorial on how to do it.
It literally took me 10 minutes since I already had a frame waiting around.

Start with a 12" Foam Wreath, 2 Pair of Socks (your choice of color,etc) and some ribbon.
Cut the heel and the toe out of your socks.
Cut an opening in your foam so that you can slide the sock tubes on. Arrange so that the edges are not showing.
Tie Ribbon to Wreath and Hang where desired.


7.19.2010

Menu Planning Monday


I have to apologize for not making my menu planning public lately. Hubby and I have been doing Body For Life, and I figured that no one would want to see the unhealthy boring meals that we have been eating.

Here is our plan for this week.

Monday - Shrimp Stir-Fry

Tuesday - Chicken Parmesan on Spinach Pasta with Healthy Marinara Sauce

Wednesday - Salmon, Brown Rice, Mixed Veggies

Thursday - VACATION

Friday - VACA

Saturday - VACA

Sunday - VACA

7.18.2010

Fabric Flower Collage

I love the fabric flower trend. I wanted to show you all a couple of really cute ideas and styles.

Check out the links for tutorials!

1. http://kindawonderful.typepad.com/pink_paper_peppermints/2008/05/31-crafty-flo-3.html

2. http://blairpeter.typepad.com/weblog/2007/01/fabric_flower_f.html

3. http://goingsewcrazy.typepad.com/my_weblog/2009/04/april-flowers-tutorial.html

4. http://allsorts.typepad.com/allsorts/2007/04/the_worlds_long/comments/page/1/

5. http://blog.craftzine.com/archive/2009/05/how-to_make_fold_and_twist_flo.html

6. http://www.craftster.org/blog/?p=60

7. http://www.twopeasinabucket.com/userblog.asp?user_id=352421&hy=2008&hm=10

8. http://www.ihanna.nu/blog/?p=709

9. http://yourfabricplace.blogspot.com/2009/05/fabric-flower-craft-is-great-way-to-use.html

7.17.2010

Tortilla and Black Bean Pie

This is a great meal.

A go-to in our house.

The original recipe by Martha was meat free, which is great. Our family typically prefers to have a main dish with meat in it, so I add a little chicken.

This is my adapted recipe...


Tortilla and Black Bean Pie

Ingredients:

4 (10-inch) flour tortillas

1 c. cooked or shredded Chicken

1 tbsp. canola oil

2 T. dehydrated onion

2 cloves garlic, minced

½ tsp. ground cumin

coarse salt and ground pepper

2 (15-oz.) cans black beans, drained and rinsed

1 ½ cups water

1 (10-oz.) package frozen corn

4 scallions, thinly sliced, plus more for garnish

8 oz. shredded Mexican cheese

sour cream and salsa, for serving


Directions:

Preheat oven to 400°. Using a paring knife, trim tortillas to fit a 9-inch springform pan, using the bottom of the pan as a guide. Set aside.

Heat oil in skillet over medium heat. Add onion, jalapeno, garlic, and cumin; season with salt and pepper. Cook, stirring occasionally, until onion is softened, 5-7 minutes.

Add beans and beer to skillet and bring to a boil. Reduce heat and simmer until liquid has almost evaporated, 8-10 minutes. Stir in corn and scallions and remove from heat. Season with salt and pepper.

Fit a trimmed tortilla in the bottom of the springform pan; layer with ¼ of the beans and sprinkle evenly with some of the cheese. Repeat three times, using all of the remaining cheese on the top layer. Bake until hot and cheese is melted, 20-25 minutes. Unmold pie; garnish with scallions. To serve, slice into wedges and serve with sour cre
am and salsa.

7.15.2010

Mason Jars

I really wish that I had a wedding reception or outdoor party to plan, because I am obsessed with Mason Jars. I think it is so amazing that such an old rustic item can be used for such beautiful creations.

What do you think?


PS...sorry for being a slacker. I really have no excuse except that I have been enjoying summer and my kids.

7.02.2010

Best Coffee Cake. Ever.

You all know by now that I love the Pioneer Woman. This is another one of her AMAZING recipes.
Ingredients
  • FOR THE CAKE:
  • 1-½ stick Butter, Softened
  • 2 cups Scant Sugar
  • 3 cups Flour, Sifted
  • 4 teaspoons Baking Powder
  • 1 teaspoon Salt
  • 1-¼ cup Whole Milk
  • 3 whole Egg Whites, Beaten Until Stiff
  • _____
  • FOR THE TOPPING:
  • 1-½ stick Butter, Softened
  • ¾ cups Flour
  • 1-½ cup Brown Sugar
  • 2 Tablespoons Cinnamon
  • 1-½ cup Pecans, Chopped
Preparation Instructions

Preheat oven to 350 degrees. Sift together flour, baking powder, and salt. Beat egg whites and set aside.

Cream butter and sugar. Add flour mixture and milk alternately until combined. Don’t overbeat. Fold in beaten egg whites with a rubber spatula. Spread in a well-greased 9 x 13 or 8 x 11-inch baking pan (use the latter if you want thicker slices of cake.)

In a separate bowl, combine topping ingredients with a pastry cutter until crumbly. Sprinkle all over the top.

Bake for 40 to 45 minutes, or until no longer jiggly. Serve warm—delicious!


Cravings Fulfilled,
Tamber

7.01.2010

Decorative Bow Frame

Little girls rooms are supposed to be beautiful....right?

Okay, well, my little one had an wall of an eyesore.

This is how I had displayed her hair bows in the past.

Okay, it worked, but it wasn't very pretty.

After learning how to make a fabric flower, I decided to decorate a Frame for her bows and make it a little more beautiful.

Here was the process that I went through:


Much better than before!

giveaways

Cravings Fulfilled,
Tamber